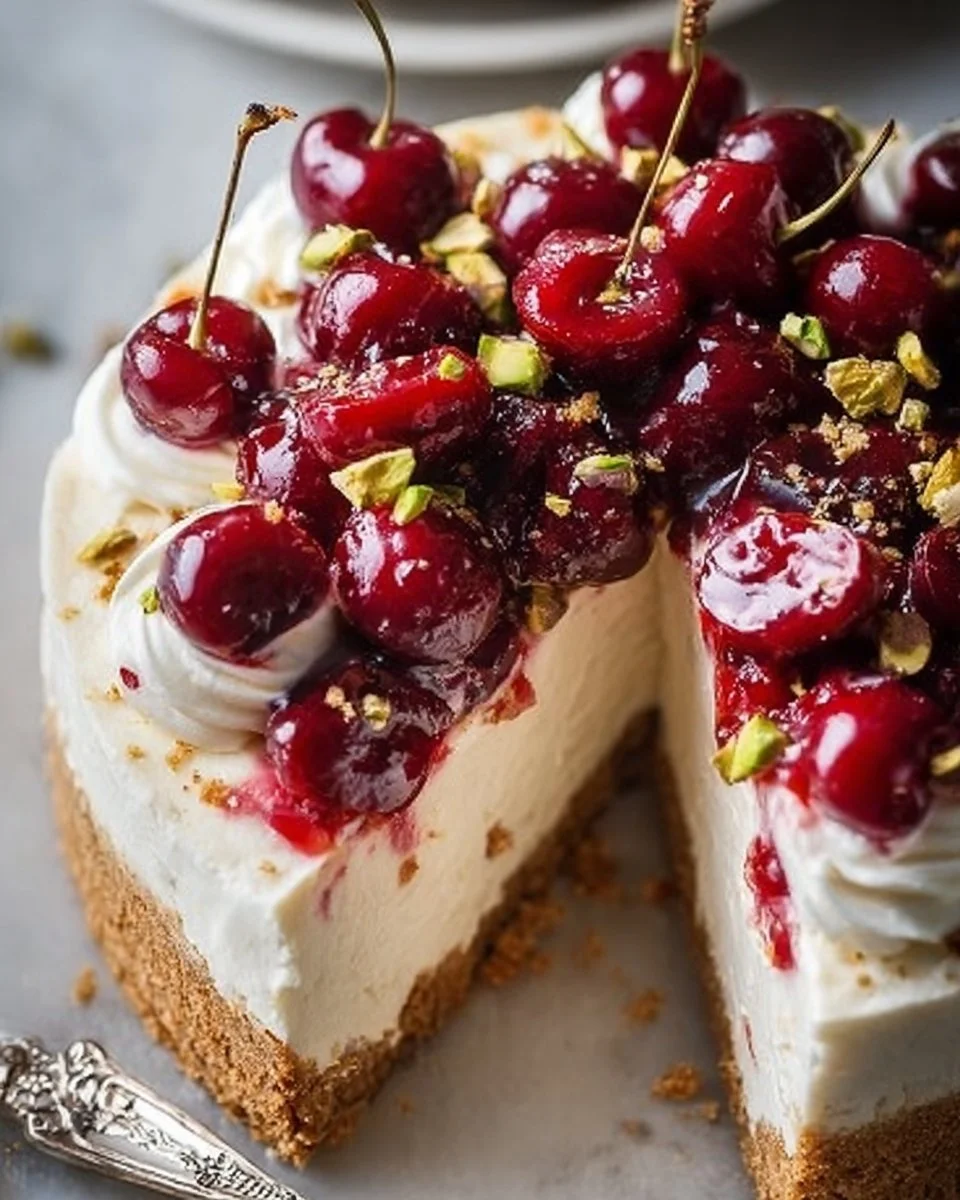
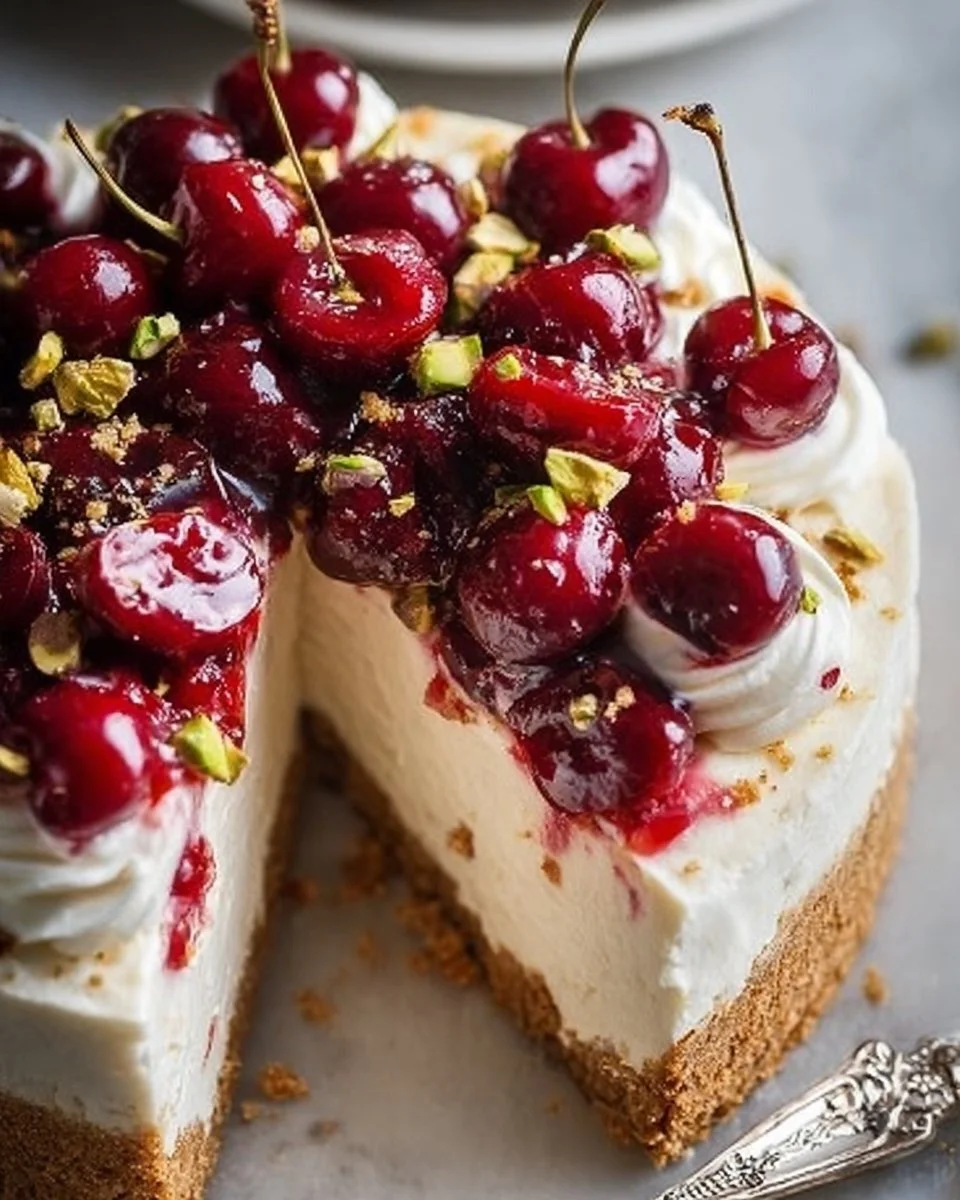
Cherry Pistachio Cheesecake is not just another dessert; it’s a delightful fusion of flavors that leaves a lasting impression. Imagine creamy cheesecake enriched with the nutty crunch of pistachios and the bright, tart sweetness of cherries—it’s a perfect treat for any occasion. This cheesecake is visually stunning and serves as a showstopper for gatherings or a simple indulgence at home. Whether you’re hosting a party or treating yourself, this recipe promises to impress with every bite, making it a must-try for cheesecake lovers.
What Makes This Recipe Stand Out
This Cherry Pistachio Cheesecake stands out because it’s simple, and straightforward, yet delivers deep flavors that feel luxurious. The combination of tart cherries and crunchy pistachios adds a unique twist to traditional cheesecake. Also, it requires no baking for the crust, which saves time and effort. This dessert is budget-friendly, requiring pantry staples and seasonal fruit, allowing you to create something special without breaking the bank. The end result is a creamy, decadent cheesecake that’s sure to please everyone.
A Peek into the Preparation Process
Bringing this Cherry Pistachio Cheesecake to life is easy and rewarding. You start by making a buttery graham cracker crust that forms the foundation for the creamy filling. Next, whip up a delicious mixture of cream cheese, sugar, and sour cream, which you’ll fold into whipped heavy cream to create a light texture. After baking, the cake sits until it cools, providing you with a beautiful base for the cherry topping that’s both easy and scrumptious. Assembling this dessert is simple, making it perfect for beginners and experienced bakers alike.
Ingredients
- Prep time: 30 minutes
- Cook time: 50 minutes
- Total time: 4 hours 30 minutes (includes cooling and chilling)
- Servings: 12
- 1 1/2 cups graham cracker crumbs
- 1/2 cup unsalted butter, melted
- 1 cup cream cheese, softened
- 1/2 cup granulated sugar
- 1 teaspoon vanilla extract
- 1/2 cup sour cream
- 1 cup heavy cream
- 1/2 cup pistachios, finely chopped
- 2 cups cherries, pitted and halved
- 1/4 cup cherry preserves
- 1 tablespoon lemon juice
The star of this dessert is undoubtedly the cherries and pistachios. The cherries provide a balancing acidity that contrasts beautifully with the rich creaminess of the cheesecake, while the pistachios add a delightful crunch that elevates each bite.
Step-by-Step Instructions
- Preheat the oven to 325°F (160°C). In a medium bowl, combine graham cracker crumbs and melted butter until well mixed. Press this mixture firmly into the bottom of a springform pan to create a solid crust. Bake for 8-10 minutes or until it becomes lightly golden. Remove from the oven and let it cool completely.
- In a large mixing bowl, beat the softened cream cheese with an electric mixer until it’s smooth and creamy. Gradually add in the granulated sugar and vanilla extract, mixing until everything is combined completely. Next, fold in the sour cream until the mixture is smooth and creamy.
- In another bowl, whip the heavy cream until stiff peaks form. Carefully fold the whipped cream into the cream cheese mixture, ensuring you maintain the lightness and airiness. Once combined, stir in the finely chopped pistachios, which will add a lovely crunch to the filling.
- Pour the cheesecake filling over the cooled graham cracker crust in the springform pan. Bake for 45-50 minutes, keeping an eye out for a set texture—there should be a slight jiggle in the center. After baking, allow it to cool completely at room temperature.
- In a saucepan over medium heat, combine the pitted and halved cherries, cherry preserves, and lemon juice. Cook this mixture until it becomes bubbly. Allow it to simmer for a few minutes while stirring occasionally, then let it cool down.
- Once the cheesecake has cooled entirely, carefully spread the cherry mixture over the top of the cheesecake. Cover the springform pan and place it in the refrigerator to chill for at least 4 hours, or overnight if you have time. This allows the flavors to meld beautifully.
- When ready to serve, remove the cheesecake from the fridge, slice, and serve chilled. You can garnish each slice with whipped cream or a sprinking of chopped pistachios for an extra touch.
Pro tip: When mixing in the whipped cream, be gentle to keep the air bubbles intact, which results in a lighter cheesecake!
Serving Suggestions
This Cherry Pistachio Cheesecake is delicious on its own, but serving it with accompaniments can take it to another level. Here are some ideas for pairing:
- Top with a dollop of freshly whipped cream for added richness.
- Serve alongside fresh berries or a berry compote to enhance the fruitiness.
- Pair with a refreshing glass of iced tea or a light sparkling wine to balance the richness of the cheesecake.
- This cheesecake makes an excellent dessert for celebrations, holiday gatherings, or a lovely family dinner.
How to Store and Reheat
To keep your Cherry Pistachio Cheesecake fresh, store it in the refrigerator, covered, for up to 5 days. The flavors tend to deepen and improve after the first day, making it even more enjoyable. If you prefer to make it ahead of time, this cheesecake freezes well too; just wrap individual slices in plastic wrap, followed by a layer of aluminum foil, and store in the freezer for up to 3 months.
Unfortunately, cheesecakes do not reheat well because they can lose their creamy texture. It’s best to serve the cheesecake chilled straight from the fridge.
Expert Recommendations for Success
To ensure your cheesecake comes out perfectly, here are some expert tips:
- Allow your cream cheese to come to room temperature before mixing; this creates a smoother filling.
- Do not overmix once you add the whipped cream, as this can lead to a dense texture.
- If using frozen cherries, thaw and drain them well to avoid excess moisture in the topping.
- Let the cheesecake cool gradually at room temperature before refrigerating to prevent cracking on the surface.
Delicious Variations to Try
Customize your Cherry Pistachio Cheesecake with these fun variations:
- Use other nuts, like walnuts or almonds, if you don’t have pistachios on hand.
- Swap cherry preserves for other fruit preserves like apricot or raspberry for a different flavor profile.
- Try adding a touch of almond extract along with the vanilla for a more complex flavor.
- Mix in some mini chocolate chips for an extra layer of deliciousness.
Common Questions Answered
- Can I use a different type of crust?
- Absolutely! You can use chocolate cookie crumbs, Oreo cookies, or even a nut-based crust for a unique twist.
- How do I know when my cheesecake is done?
- The cheesecake is ready when the edges are set, but the center should still have a slight jiggle. It will firm up as it cools.
- Can I make this cheesecake ahead of time?
- Yes! This cheesecake can be made up to three days in advance, which makes it perfect for entertaining.
- Will this cheesecake crack?
- If you cool it gradually and avoid overmixing, your cheesecake is less likely to crack.
- What’s the best way to slice cheesecake?
- Use a warm knife, dipping it into hot water and wiping it dry before each cut for neat slices.